

Is it Real or is it a Wrap?
While they’ve been around for many years, vinyl wraps – digitally printed graphics applied to vehicles, walls, floors, appliances, and more – are growing rapidly in popularity. Wraps are designed and installed by skilled sign and graphics professionals who use their talents and wide-format inkjet printers from Roland DG to turn the ordinary into the truly unusual. One of the techniques they use to make you do a “double-take” is incorporating 3D designs that create stunning optical illusions.
While most projects involve cars, vans and trucks, wrap specialists like Louisville, Kentucky-based Digital EFX also apply graphics to all kinds of unconventional objects. Below are some examples – all produced on Roland printers – that you simply must see to believe:
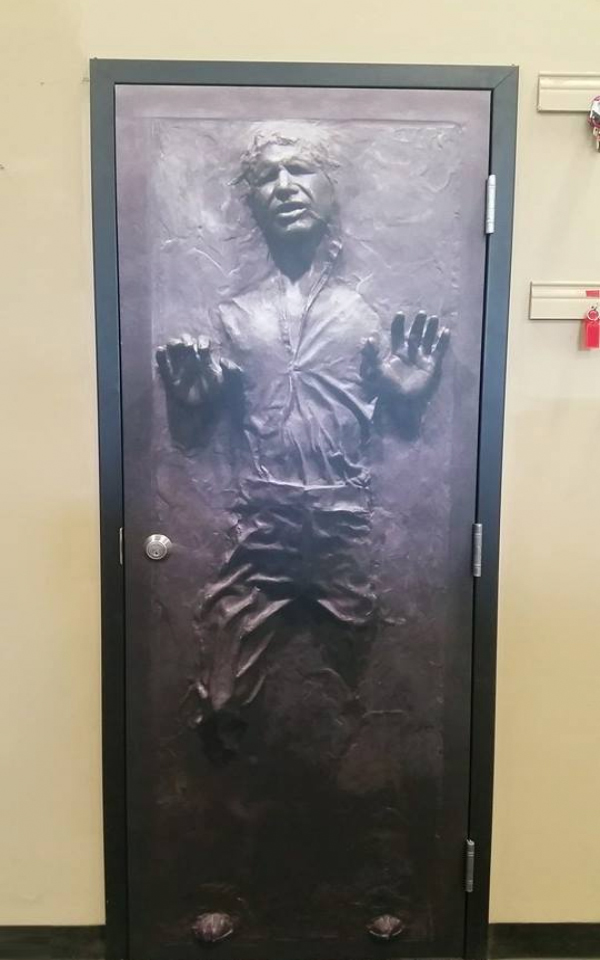
A vinyl wrapped closet door that looks like it came straight off the set of Star Wars. Image courtesy of Digital EFX Wraps LLC

A wrap that shows the anatomy of a sporty mini – a really cool effect that certainly makes you look twice! Image courtesy of Think Image

Is this an elevator in an upscale hotel? No, this is an ordinary floor and elevator wrapped in graphics created by film set designer, Martin T. Charles to give an amazing vintage appearance.

A prize-winning wrap that surely turned a few heads on British motorways. Image courtesy of The Vinyl Cut

A floor wrap that looks like you can jump right in! Image courtesy of Roland DG UK

It’s hard to tell that this pillar was not actually made of marble and that the floor is not actually tiled.
A stunning piece of wrapping that turned a generic fridge into this super-cool retro masterpiece. Image courtesy of RM Wraps

This apocalyptic rat-look wrap for the Lotus F1 Team celebrated the Mad Max Fury Road movie and looks terrifyingly realistic. Image courtesy of Motor Authority.com
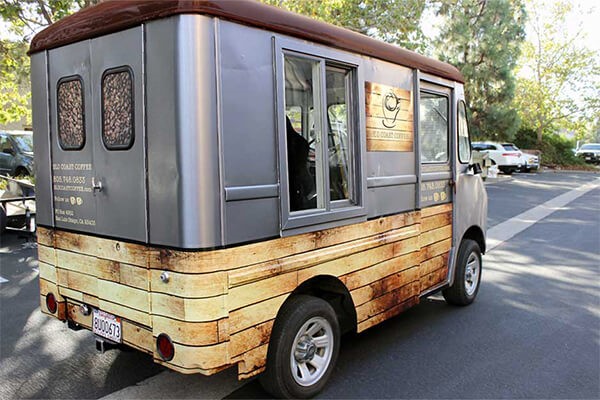
Food trucks are a common wrap application. This one is covered with graphics to appear like retro wood and metal paneling. Image courtesy of Lola Red Design Group

A lesson on how to turn a regular bathroom into a fantasy lagoon with vinyl graphics. Image courtesy of Monster Image Digital printing
How Vinyl Wraps are Made
Matt Richart owns and operates a successful wrap operation at Digital EFX Wraps. According to Richart, the design phase of any wrap project is just as important as the printing and installation.
“Most wraps start out as high-resolution Photoshop files,” notes Richart. “Using high-resolution graphics is important for high-quality output. For vehicle wraps, I also recommend taking photos of the van or car so they can be brought into Photoshop for scaling, sizing, and color correction before the artwork is printed.”
Richart designs in Photoshop in 1/3 scale at 360 dpi. When sending the file to the RIP program, he enlarges it to three times the actual size to get the full scale, which reduces the resolution of the output from 360 dpi to 120 dpi. “If the file is 120 dpi at full scale, the resolution should be fairly clean and crisp, so if you start out with an image that’s between 90 dpi and 120 dpi, you should get the kind of quality output you’re looking for,” he added.
As far as color is concerned, Richart says that he always designs in RGB. “Although digital wide-format inkjets like Roland’s printer/cutters convert all files into CMYK during the RIP process, starting out with an RGB file instead of a CMYK file will result in a ‘cleaner” conversion’ with a better color gamut,” Richart points out. “It’s also important to test print your colors on the same type of film you’ll be using for the actual printing and installation. Be sure to place your test prints in lighting that is similar to the final location, to ensure that colors look correct.”
Richart advises wrappers to work off a photo or template to ensure proper placement of the printed wrap panels during installation. In addition, because precision is crucial to a successful wrap, he strongly recommends confirming that all of the sizing and measurements are accurate before starting the printing process. “I tell the students in my Roland Academy wrap classes to print on a less expensive paper in draft mode to check the sizing and scaling before the final printing,” said Richart. “While the resolution and color won’t be accurate, the sizing will be true. You’ll also be able to determine whether the graphics and lettering are falling in the right areas, and whether the scaling is correct. For a vehicle wrap, you don’t need to print an entire side for proofing purposes – printing a door or other specific area will suffice.”
Richart uses Roland printer/cutters, which feature integrated contour cutting, as well as independent Roland printers and vinyl cutters, in his wrap shop. He and his crew rely on several 64-inch Roland SOLJET® printer/cutters, and a newer Roland TrueVIS™ VG-640 printer/cutter, to produce most of the vehicle graphics for his customers. “Our Roland printers consistently deliver vibrant prints with rich color and excellent detail,” he said. “The performance of these inkjets is a big part of our overall success.”
According to Richart, when it comes to wraps, design and layout are the most time-intensive parts of the overall process. “A typical vehicle wrap job usually requires anywhere from one to two weeks for design, emails, and approval time, depending upon how fast you can get the feedback from the client,” he noted. “Typically, there will be two to four revisions before we get final client approval. Once the design has been approved, it takes us about two to three days to print, laminate, and install a full vehicle wrap. While the overall completion time for jobs can vary, we tell our clients to expect a turnaround time of about three to five days once the artwork has been completed and approved.”
Wrap professionals like Richart are adept at creating unique, attention-getting and customer-pleasing wraps.
About Roland DGA
Roland DGA Corporation serves North and South America as the marketing, sales and distribution arm for Roland DG Corporation. Founded in 1981 and listed on the Tokyo Stock Exchange, Roland DG of Hamamatsu, Japan is a worldwide leader in wide-format inkjet printers for the sign, apparel, textile, personalization and vehicle graphics markets; engravers for awards, giftware and ADA signage; photo impact printers for direct part marking; and 3D printers and CNC milling machines for the dental CAD/CAM, rapid prototyping, part manufacturing and medical industries. To learn more about Roland DGA, visit www.rolanddga.com.