

Everyday Actions For Photoshop

Actions have been a part of Photoshop for decades now, but many people simply fall into the habit of performing the same steps over and over without ever thinking of recording an action. However, short actions are easy to record, easier to run, and automating ordinary tasks leaves you freer to create. Over the next two articles, I’ll show you how to record, edit, troubleshoot, and save the steps you need to take every time you want to transform a common drop shadow into a realistic shadow, such as one that falls on the ground and not the wall. The action itself, though short, demonstrates the basic skills you’ll need to write similar actions that are useful to your way of doing things.

While Layer Styles are great, they can only cast shadows on a “wall” behind your subject or text. A simple action sets up your document so you can transform a drop shadow into any suitable shadow.
To start, create a file to serve as a prototype and add an object or type on an empty layer above the Background layer. In the Actions panel, create or target a folder to hold your action—they can’t be saved outside a set, although a set may contain only one action. Next, click on the New Action icon, name the action in the popup, create a keyboard shortcut for it (optional, and you can do this later), and click OK to start recording (the Begin recording icon turns red).
![]()
From left to right: Stop playing/recording; Begin recording; Play selection;
Create new set; Create new action; Delete
In order to transform and/or mask a shadow, it has to be on its own layer, but you can start with a standard or custom Drop Shadow layer style. However, if you add a named layer style (or other preset) that you’ve saved to your action, that name gets hardwired into the action and the action always looks in the same place for that named preset. To keep an action from stopping to tell you it can’t find something when presets aren’t loaded or get deleted, you’re often better off including generic settings for the preset, and then modify those on a case-by-case basis.

Whenever an action encounters a named element (shown here in quotes), it looks for something with that name before proceeding. The action stops with a warning if it can’t find it. “Background” and “Layer 1” are also named elements.
The simple solution here is to record the process of creating a drop shadow in the Layer Style dialog box. The style sets distance, blend mode, opacity, etc., right within the style, which might not always be suitable for the shadows you want to create, but you can modify all those settings afterwards on the shadow’s own layer—all you need to record are any typical settings you use for a standard drop shadow.
Click on the fx icon at the bottom of the Layers panel and select Drop Shadow from the bottom of the menu. If the default shadow is one you like, click OK in the dialog box as soon as it opens. My shadows often begin lighter and a bit softer, so I might adjust the Opacity and Size settings slightly. However, it’s easier to make a shadow lighter or softer afterwards than to make it much darker or harder, so stay flexible with a shadow near the default settings. Of course, as easy as this is to do, you could make a separate soft, light shadow and hard, dark shadow action by editing one action to generate the other. The next article will show you how to edit actions.
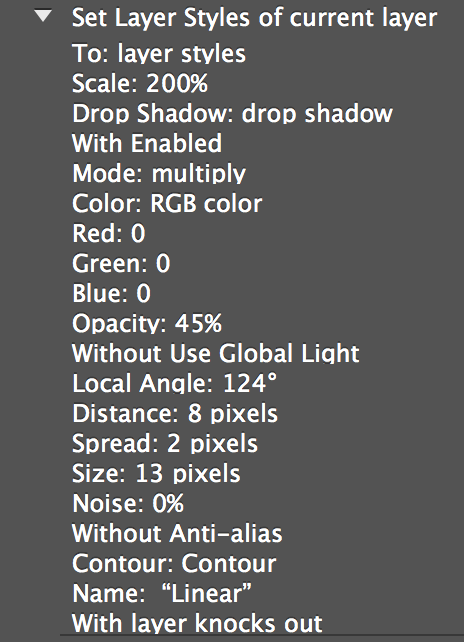
Creating settings within the action itself avoids adding a named style, and in this action they are easy enough to modify after the action has been run.
With your drop shadow set up, click OK to exit the dialog box. The next step of the action is to put that drop shadow on its own layer. Right-click or Ctrl-click (Mac) on the fx icon at the far right of the layer to open its context-sensitive menu. Select Create Layer from the menu. A warning dialog will pop up telling you that some effects can’t be reproduced when you put them on their own layer. Having read this once, I really never need to read it again, and I don’t want to have to respond to this every time I run the action. If you don’t want to see it over and over again either, click on the Do Not Show Again checkbox. This turns off this warning not only in the recorded action, but every time it might pop up again in the future. You can bring it back at any time by pressing the Reset All Warning Dialogs button in General Preferences.
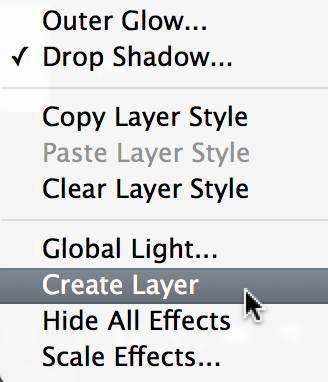
Right-click or Ctrl-click (Mac) on a layer’s fx icon to open the menu for editing a Layer Style effect.
At this point, you’ve achieved your main objective and saved yourself a few steps when setting up to transform a shadow. Click on the Stop playing/recording (square) button and your action is done. Set up your file again the way it was before you recorded the action (step back in History), then highlight the action’s name, press play, and see the shadow layer appear in an instant. To save the action to your hard drive, target the action set (not the action) to highlight it, and select Save Actions from the panel menu.
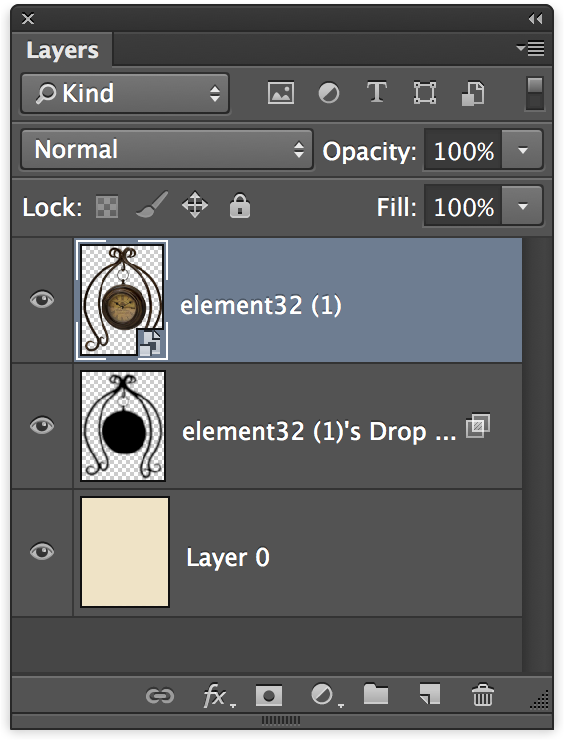
At this stage, the shadow has been converted to pixels on its own layer. The original image layer is still targeted and there’s no layer mask for editing the shadow, but the basic objective has been achieved.
Saving an action doesn’t mean the saved state is the last word on it; you can edit actions, modify how they run, duplicate them and alter the spinoff, reusing many of the steps you just performed, and troubleshoot to pinpoint any unexpected results. I still want this action to target the shadow layer and add a layer mask for me, and I want to test that the action is doing everything I expect it to, but I’ll leave all that for the next article.
Cristen,
Nice start on how to create an action for a customized drop shadow. Well written. I look forward to the rest of the story.
Thank you. I use little actions all the time, and never gave them much thought until it occurred to me how much I rely on them.
this is a link
The shadow from the back legs is so unrealistic though – it would only look like that if the back legs were up in the air, not touching the ground.
Hi Frank. Look for Part 2. This is only the first step towards creating an action. Obviously, more needs to be done, and you will have to intervene manually for some of it, depending upon your original subject. — Cristen (for some reason, my name belongs to a registered user so I’m not allowed to use it. I am a registered user, but I apparently don’t know what name I am allowed to use. <G>)