

CreativePro Speaker Spotlight: Deke McClelland, the Photoshop Nerd


Well, this is our last post of the 2016 series of posts called Speaker Spotlight, designed to highlight each of our upcoming CreativePro Conference speakers and of course, Deke had to be different! ;-) So no interview but an awesome tutorial instead. Enjoy!
For those of you who haven’t been following the series, we’ve assembled a dream team roster of Photoshop and Illustrator gurus, and thought you’d like get to know what makes them tick, why they’re passionate about what they do, and what you can expect to learn from them at the conference. (Our previous Speaker Spotlight was on Colin Smith.)
The subject of this Speaker Spotlight is the out-of-this-world, one and only Deke McClelland.
Love,
Deke
The Color Range Command:? Your More Magical Selection Tool
The best selection tool in all of Photoshop isn’t a tool at all; it’s a command. Found in the Select menu, this much-needed upgrade to the Magic Wand goes by the name Color Range. It’s dynamic, it recognizes gradual organic edges, and it serves as a fantastic introduction to the larger world of masking. In fact, to this day, I can select certain things with the Color Range command that would take far more effort using any other masking technique.
I don’t love Color Range because it’s the best or most reliable or most powerful masking feature—I’m really not sure there is such a thing—but rather because it demands the least from you and delivers the most in return.
The Color Range command was intended as a replacement for the Magic Wand tool in Photoshop. In many regards, Color Range is Magic Wand 2.0. And although it’s a command, it works much like the Magic Wand tool, in that you click in the image to set a base color for your selection.
You can also Shift-click to add base colors or Alt-click (on the Mac, Option-click) to subtract them. Only Shift-Alt-clicking (Shift-Option-clicking) doesn’t do anything in Color Range.
But while using the Color Range command may seem familiar, it produces much different—and usually superior—results to the Magic Wand. For one thing, where the Magic Wand tool employs a problematic version of anti-aliasing, Color Range responds to the natural ebb and flow of luminance in an image, making it a much more natural choice for making selections in photographs. Plus, you can apply changes dynamically, eliminating the guesswork associated with using the Wand and its static Tolerance value setting. Here I’ll show you a comparison of selections made with each feature in order to demonstrate the superiority of Color Range.
Pearl of Wisdom
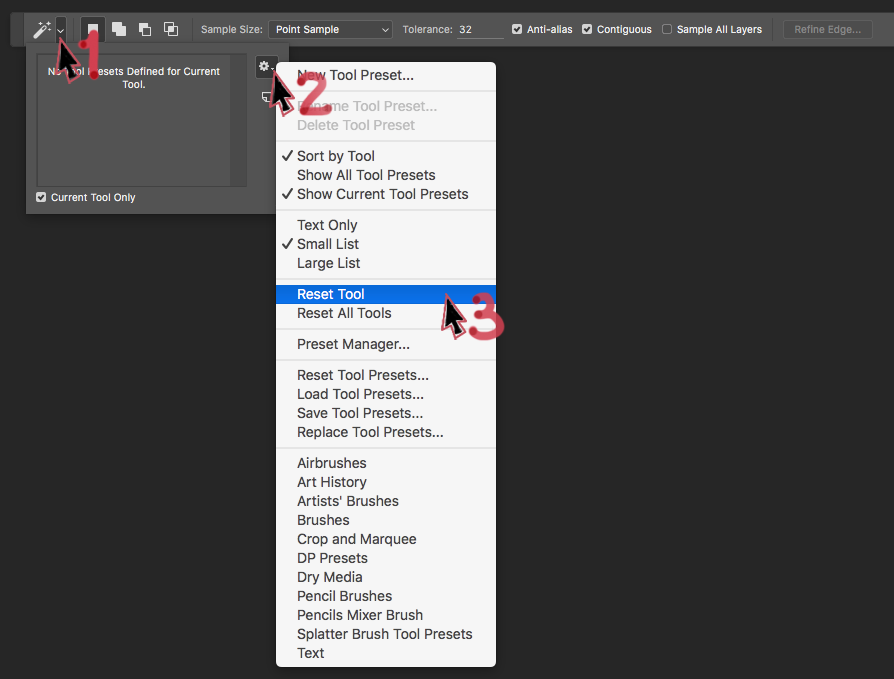
If you’re going to follow along, you’ll want to restore the default settings for both the Magic Wand tool and the Eyedropper tool so that they behave the same as mine do. To restore the default settings for any tool, first choose the tool from the toolbar. Then click on the down-pointing arrow to the right of the tool icon in the Options bar. Click the gear icon in the pop-up menu, then choose Reset Tool.
1. Start by opening the image.?Open the file Another gradient demo from Deke.psd.?This image features two gradients divided by a solid-color bar. I made this document for the express purpose of demonstrating how both the Magic Wand and the Color Range commands choose to select pixels.
If you’re working along with me, you should see a vertical guideline down the center of this image. If you don’t see it, press Ctrl-; (or Command-; on a Mac).

2. Choose the Magic Wand tool from the toolbar.?Notice that the Tolerance is set to 32 by default. If you click on that vertical guideline in the top blue area, you’re going to select 32 luminance levels lighter and 32 luminance levels darker, averaged across all three of the color channels, as indicated by the marching ant–delineated selection below.

3. Change the Tolerance value to 120 in the Options bar.?Let’s say you want to select a wider range of luminance values. Enter 120 in the Tolerance field, and then press the Enter key or the Return key on the Mac.
Nothing happens. Your selection outline doesn’t change, because the Magic Wand selection is a static modification. (This is one of the downfalls of the Magic Wand that I mentioned earlier.) Press Ctrl-D or Command-D on the Mac to deselect the image so you can start over.
4. Click a little bit to the right of the guideline.?Because of the way this gradient was designed, clicking slightly off-center helps better center the selection. Notice that because the Contiguous check box is turned on, we’re just selecting adjacent pixels; we’re not jumping the orange gap.

5. Switch to the Channels panel to inspect the selection. Alt-Click or Option-Click on the Save Selection as Channel icon at the bottom of the panel to bring up the New Channel dialog box. Name your channel Magic Wand 120 and click OK.

6. Examine the Wand selection.?In the Channels panel, click on the Magic Wand 120 channel, so you can take a closer look at it. Press Ctrl-D (Command-D on a Mac) to deselect the image, and zoom in so you can see that even though the Anti-alias check box is turned on, we have nothing resembling gray pixels going on here.

Pearl of Wisdom
The jagged selection outline is due to the dithering that’s inherent in the gradient. Dithering, by the way, is a random variation in the coloring of neighboring pixels that helps the gradient look smoother. Needless to say, it doesn’t work very well with the Magic Wand tool. That doesn’t bode well for making selections in photographs that have smooth transitions.
7. Switch back to the full RGB image.?Zoom back out by pressing Ctrl-0 (or Command-0 on a Mac), and let’s see how things work similarly, but better, with the Color Range command. Switch back to the RGB image by clicking the top channel in the Channels panel. Then tap the D key to ensure that you’ve got your default colors selected.
8. Choose the Color Range command.?Go up to the Select menu and choose Color Range. If you have the default settings in place, your Fuzziness value should be set to 40. You should still see the full-color image in the image window, and you should also see a black rectangle in the center of the dialog box. (If you see something else there in the center of the box—the full-color image, for example—click the Selection option.)

9. Set a base color for your selection.?All the pixels that the Color Range command is currently selecting are represented by white in this preview window; so since the preview is totally black, it’s not going to select anything at the moment. Click with the eyedropper in the image window—right on that same center guideline you used for the Magic Wand selection—and you’ll see that you’re starting to select some pixels, indicated by that white band down the center of the preview.
In other words, the eyedropper is your magic wand when you’re working inside the Color Range command.

10. Change the Fuzziness value in the dialog box. The Fuzziness setting works a lot like the Tolerance value, in the sense that—at the default value of 40—we’re selecting 40 luminance levels lighter and 40 luminance levels darker from the place where we initially clicked. However, there are two big advantages to Fuzziness. For one thing, it’s dynamic. So if you increase that Fuzziness value to 120 in the dialog box, then you’re expanding the selection on the fly, as you can see by the expanding white area the image preview.

The second advantage of Fuzziness, is the gradual drop off. In other words, the color on which you clicked is absolutely selected, the colors that are 121 luminance levels away are absolutely deselected, and everything in between is partially selected (based on how close in color it is to that base color on which you clicked). So we’ve got a nice gradual drop off that’s more in keeping with the continuous tone image. Also notice that the selection jumps the gap, so Color Range is selecting non-adjacent pixels.
Pearl of Wisdom
Unless you turn on the Localized Color Clusters checkbox, Color Range will always select non-adjacent pixels. You can learn more about this in the unlocked movie you can watch at Lynda.com here.
11. Save the Color Range selection.?To get a closer look at the subtleties of the Color Range selection, let’s compare it to the Magic Wand’s work we saved earlier. Click OK to close the Color Range dialog box, and you’ll switch from that mask-like preview to a marching ant-deliniated selection in the image window. Go to the Channels panel, once again Alt-click (Option-click) the Save Selection as Channel button at the bottom of the panel, and name your selection Color Range.
12. Examine the Color Range selection in the Channels panel.?Press Ctrl-D (Command-D on the Mac) to deselect the image, then head over to the Channels panel and remind yourself of how sad that Magic Wand selection was by clicking on its channel. Then click on the Color Range channel, and see your new improved selection in its full glory. The Color Range selection not only jumps the orange gap, but it also generates these very soft selections. As you can see, it’s doing a brilliant job of following that contouring and dithering pattern at work inside the gradient.
You can imagine if it works on a gradient like this, the Color Range command might just be the tool you need to grab selections from your continuous tone photographs.
Pearl of Wisdom
I’ve got an unlocked movie at Lynda.com, “Working in the Color Range dialog box,” where you can learn more about the Color Range dialog box—like what Localized Color Clusters are, how to expand your selection to include a (well) range of colors, and what your options for previewing your selection look like. If you’d like to watch my entire Photoshop Masking and Compositing: Fundamentals course, you can get a free 10-day trial by going to lynda.com/deke.
Where can you find Deke on the Web
Website: https://www.deke.com/
Social Profiles:
What past conference attendees have to say about the Photoshop nerd:
“I’m a big fan of Deke. I really liked having Photoshop tips from the designer’s perspective.” ~ 2015 Photoshop Conference attendee
“I really wanted to meet Deke and tell him how much his videos on Photoshop @ Lynda helped me a few years ago with a presentation I gave at the XMPie Users Conference. I used one of his actions, and automated (for personalization) that using our software.” ~ 2014 PePcon attendee
 Register today for the CreativePro Conference!
Don’t miss out on a great show! Reserve your spot today!
See you in Minneapolis, Jul 10-13th!
In the example gradient image I downloaded, the vertical guideline was part of the image and not a guideline that could be turned on or off, so when clicking on the guideline, it got selected rather than the gradient ranges on either side. But I understand the takeaway of the tutorial. Thanks!