

Bit by Bit: Preserving History with Panoramic Portraits


On a beautiful day in early June, I arranged 63 park rangers and four horses into a circle around my camera in Yosemite National Park. The occasion was the twelfth anniversary of the last time the rangers got together for a group-in-uniform portrait (see Figure 1). This was also the first time the rangers had ever posed for a 360-degree portrait in front of Half Dome, Yosemite Falls, and Cathedral Spire. It is very likely the most beautiful backdrop for a professional portrait in the world, and these fortunate federal officers, whose everyday work takes them to some of the most inspiring views on earth, were great subjects for a panoramic portrait.
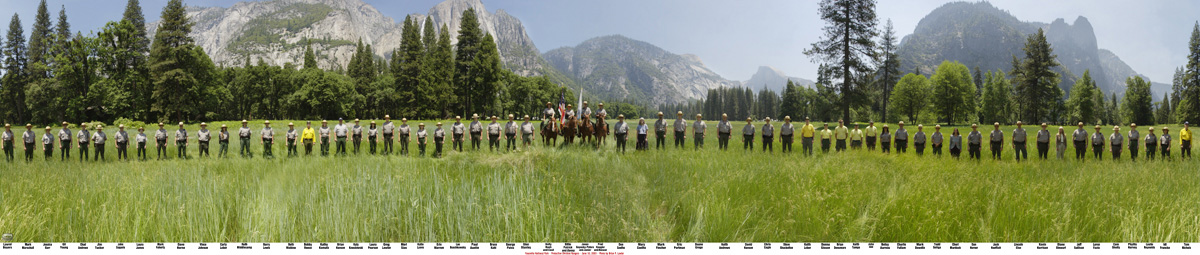
click on image for a larger versionFigure 1: The Yosemite National Park Protection Division Rangers, June 10, 2003. The location is Cook’s Meadow near Yosemite Lodge. In the distance are Yosemite, Half Dome, and Cathedral Spires.
This was not my first panoramic group portrait; I have made many of them. The largest number of people I have posed for a 360-degree photo is more than 200; the smallest was my “group” panorama of my son Patrick and his friend Kevin Jacobs, who moved in front of the camera to be photographed 12 times in one image (see Figure 2). These panoramic photos require planning and care in the making, but are remarkable records of an event or organization when complete.

click on image for a larger versionFigure 2: Patrick Lawler and (at least) 10 of his evil twins, Carizzo Plains, California. In this image, my teenage son was positioned carefully in front of the camera for each of the twelve frames. His friend Kevin joined him in two.
Dress Right!
The first step in assembling a group of this size is to establish uniform spacing. It has been decades since my time in the military (USCG 1968-1974) and in Yosemite Valley I couldn’t remember the command for getting people to stand an arm’s length from each other (dress-right, dress!). One of the rangers came to my aid by shouting the order, and soon the rangers had spaced themselves at the correct distance.
My friend Jim Eckford was along for this photo, and he helped to arrange the line of rangers at an equal distance from the center of my tripod. To make this easier, I use a roll of strong nylon cord rolled around a cardboard core. I tie a loose knot around the neck of the tripod, then roll the string out to a set length, and use it to position the people in my panoramic portraits. If everyone stands the same distance from the camera, they all appear in proportion to each other. Jim ensured that the rangers were positioned correctly while I attended to the camera settings.
When making these group panoramas, I have determined a good working distance that provides good perspective and allows each person to be identifiable. For small groups (up to about 30 people) that distance is about 13 feet. For this group of 63 (not including horses) it was closer to 20 feet. I wanted a balance between the grandeur of the Yosemite Valley and the rangers, where they were roughly equal in visual importance.
My location was chosen carefully. I had scouted this place earlier with one of the rangers, and found a spot where Half Dome and Yosemite Falls are both visible, and where there are paved paths for the horses (the rangers were concerned about trampling the meadow ecosystem). I also planned for lots of mosquitoes, which kept every one busy swatting while they were out of the frame!
Face Forward
Most panoramic photographers shy away from people pictures, fearing the problems that occur when people move between frames – and somebody always moves. I find this to be no particular problem, as one of the two overlapping frames is always acceptable, and it’s easy to patch the final image with the better of the two (see Figure 3).

click on image for a larger versionFigure 3: City of San Luis Obispo, California, firefighters. For this image I wrapped the windows on the outside of the building with butcher paper to diffuse the sunlight, and photographed two shifts of firefighters – one coming off their shift, the other coming on. I positioned the firefighters carefully so that each shift occupied exactly half the circle. We put five engines and trucks inside the building (no easy feat) and closed the doors. One engine was left outside for the (inevitable) call that came in while we were making the image. The two shifts were photographed about 30 minutes apart, but there is no evidence of this in the photo.
To fix a blurred or damaged overlap, I use Photoshop’s lasso tool to grab just the head and shoulders of the face from the better of the two images (not very carefully), and drag it onto the final panorama. Then I use the distort tool in Photoshop to get it to match the underlying image. Once it’s placed, I carefully erase (with the brush tool eraser) extra pixels from around the face to make it look good.
I also work to avoid this kind of problem while taking the photo. I pay careful attention to faces while I am taking the individual frames. I look at the group in front of the camera for each frame, and make sure they are looking into the lens.
I also make at least two complete rotations around the circle for group
photos. On each rotation, I take 12 photos (this varies with the focal
length of your lens – mine is about 24 mm.). Somewhere in that
two-rotation collection of images I will have a good face of each and
every person in the photo, and this gives me the insurance I need to
get the entire group with good facial expressions.
The rangers were wearing their dress uniforms and their campaign hats, which must be worn just above the eyebrow line. It wasn’t an option to ask them to remove their hats for the photo, or to tilt them back (I tried, but they can’t do it). So, to supplement the midday sunlight, I added a moderately powerful strobe flash, aimed directly at the subject of each frame. This opens-up the shadows on the faces, and makes each person recognizable.
I take the photos is relatively quickly. I make sure everyone is paying attention, ask them to stand in a relaxed, but proper position, and then begin my two complete rotations. With weeks of planning, scouting, hours of travel and set-up, the actual photography was over in a couple of minutes.
Presentation Value
For my panoramic photos I use a Nikon D1X digital SLR on a homemade camera mount (see “Bit by Bit: Gearing up for Panoramic Photography“). Each frame is 17MB. After stitching with Apple’s orphaned, but still best-in-class QuickTime VR Authoring Studio software, the finished panorama is about 130MB. I did a little work in Photoshop – a little spotting in the sky, one or two faces were repaired (one of the horses moved its head between frames requiring some clean-up), and I did some shadow enhancement using my shadow masking technique (see “Bit by Bit: A Digital Fill-Flash Technique for Improving Images“). Once complete, the photo was ready for printing.
On this image I put the rangers’ names at the bottom of the print under each person (and horse). This required that I send an adequately high-resolution image via e-mail to the park so that the rangers could be identified. I created 63 layers in my finished Photoshop document, and added the text to each layer, one for each person. After two rounds of checking and corrections, the prints are now ready to go to the rangers. I will be printing them on my wide-format Epson 9500 printer with archival inks on Epson’s Luster paper. Each of the final prints is 44 inches in width; they make a handsome presentation.
Some of the most charming panoramic images I have seen are those of large groups of people taken in the early 20th century. With these panoramic portraits I am making, I hope to match the style and spirit of photographers who traveled the world recording images of groups of people in various settings (see Figure 4). I hope that I can match the style of my predecessors in accomplishing the task of recording the group for posterity in a panoramic image.

click on image for a larger versionFigure 4: Pismo Beach, California, Fire Department with the Pacific Ocean in the background. For this image I left a gap in the circle of firefighters to let the camera photograph the ocean on a beautiful and clear day. The department finished the event with a barbecue for all in attendance.
This is an interesting and informative article. But my jaw almost dropped when Brian said he e-mailed that large hi-res file so all the rangers (and their horses) could be identified! What about the old lo-tech high-school-yearbook method of passing around a clipboard just after the group photo session? It hasn’t failed me yet!
Katharine :)
Brian Lawler has a real knack of conveying his knowledge in a readily digestible from – a rare talent.
This article alone is worthy of Creativepro.com. Photographers need go to no other website for tips and techniques. This is a goldmine.
Old but still relevant article. Thanks for the share Brian!
Lana
Extensa spiegels