
When you have a series of images you want to stitch together in a panorama or grid, the auto-align and auto-blend tools in Photoshop CS3 are your best solution. They’re two incredibly powerful tools that are best used in tandem. In a way, they’re like the Photomerge of old, but CS3 does it a lot better.
In this tutorial, we’ll create a panorama.
Step 1
Open all the images that will make up your panorama in Photoshop CS3. Drag each image onto a separate layer in the same document and hold the shift key to center each image (Figure 1). You could also use a script to open the images and place them into a single layered document.

Figure 1.
Select all the layers by clicking on the bottom layer in the layers palette, holding Shift, and clicking the top layer. For this to work, you cannot have any locked or linked layers except for the background.
Step 2
Choose Edit>Auto-Align Layers. You will now see a dialog box with four options (Figure 2). For the majority of panoramas, the auto option will work the best. Click OK.

Figure 2.
Step 3
After Photoshop does a little thinking, you will see your images arranged in such a way that they overlap each other nicely (Figure 3). Don’t worry about the seams and color differences at this point. The important thing is the arrangement.

Figure 3. Click image to see larger version.
My example has eight images. Notice that the canvas size has automatically changed to accommodate all the images.
Step 4
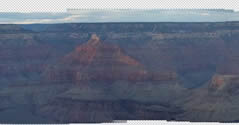
Choose Edit>Auto-Blend Layers. Very quickly, Photoshop adjusts the exposure and white balance of each image and prepares a layer mask with gradients between images. Figure 4a is a close-up that shows what a good job Auto-Blend has done with these images. Figure 4b is a comparison of panoramas created by Photoshop CS2’s Photomerge and by the Photoshop CS3 beta. What a difference!

Figure 4a. Click image to see larger version.

Figure 4b. The results of CS2’s Photomerge are on top; CS3 beta results are below. Click image to see larger version.
Step 5
Finally, crop and display your panorama (Figure 5). The hardest part of all this is trying to find a printer large enough to output these massive files!

Figure 5. Click image to see larger version.
This article was last modified on January 4, 2023
This article was first published on January 10, 2007
Commenting is easier and faster when you're logged in!