

How to Permanently Delete Cropped Data in a PDF

Have you ever tried to crop a PDF file, cutting out part of a page? It’s pretty darn easy! You use Acrobat’s Crop feature to crop it down to just the public data you want visible. Or, you could take that PDF and place it in InDesign, crop it there, and export a new PDF.
Guess what? The private data is still there. You can’t see it, but if you export the file in some other format, or use Acrobat’s content analysis features, it’s easy to find!
The frustrating truth is that Acrobat can crop a PDF, but the stuff outside the cropped area doesn’t truly go away. It is just masked, or hidden. Technically, cropping a PDF in Acrobat just changes its “crop box” rectangle, instructing software to display only what is within. The original art is all still there, hidden from view and not all that difficult to find for someone who knows what they’re looking for.
So what’s to be done? Here are two methods you can use to truly delete data that is outside the visible PDF. (If the information is truly confidential, please see “Don’t Crop It, Redact It” below.)
Hidden Information Lurks Within
In case you don’t remember (or don’t know) how to crop a PDF in Acrobat Pro:
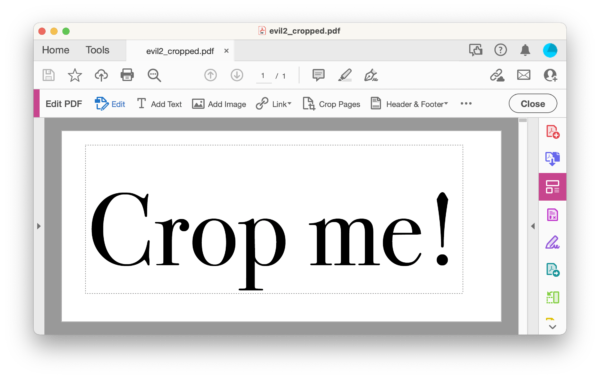
1. Select the Edit PDF tool and then select Crop Pages from the Edit PDF toolbar above. Drag out a cropping rectangle:

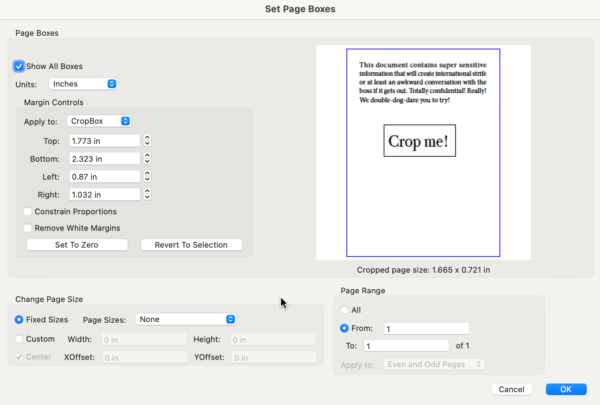
2. Double-click inside the cropping rectangle to open the Set Page Boxes dialog box:
3. Click OK, and you get what looks like a fully cropped PDF.
But as I said, the stuff out in the periphery is still there. If you open that dialog box again, you’ll see it out there.
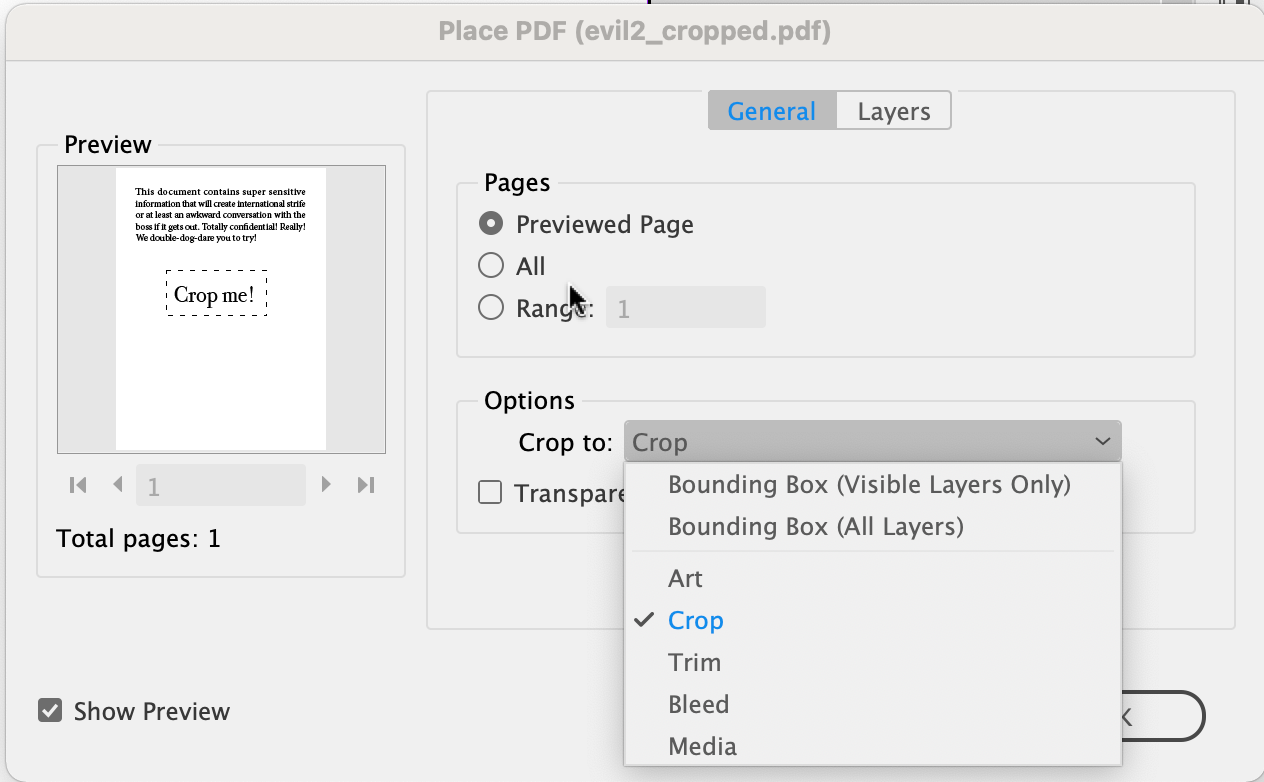
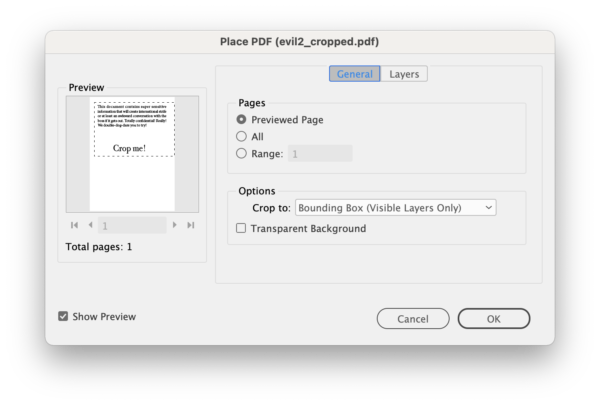
Or, if you place it in InDesign and use the Show Import Options dialog box, you can see it there, too. Selecting Bounding Box (Visible Layers Only) under the Crop to option shows all the data you cropped. (You can place your cropped file with Crop to set to Cropped—of course!)
So here’s the trick: Open the Protection tools and click Remove Hidden Information. Acrobat will process the data and provide you with a set of “hidden” information in the Results pane on the left. Then click the Remove button:

When it’s done processing, all that cropped data is gone! Not just text… even if you had image data out there, it gets cropped out.
Flatten Transparency
Here’s another way to crop a PDF, using InDesign instead of Acrobat.
First, place the PDF on a page in InDesign, and crop the graphic frame down to view just the shape you want. (It doesn’t even have to be a rectangle.) Next, apply any sort of transparency to the PDF. For example, you could set it to 99.9% opacity. Finally, export the page as a flattened PDF — that means Acrobat 4 (PDF 1.3) compatibility, such as you get when you choose the PDF/X-1a:2001 preset.
The trick here is that when the PDF gets flattened as part of the export process, InDesign leaves out all the stuff outside the cropping area!
(Of course, the annoying part is that the PDF gets flattened, which means any other transparency on the page or in the PDF is no longer around. That shouldn’t be a problem, but it’s frustrating for those of us who like to keep transparency effects unflattened.)
It sure would be helpful if Adobe Acrobat simply had a “really truly crop everything out” feature available with the crop tool. But in the meantime, keep these solutions in mind!
I often receive, for example, half title and title pages, complete with crop marks, from the cover designer for books I produce in ID. Sometimes I need to remove those crop marks. When I really need them to go away and stay away, my method is to print the PDF file to the Adobe PDF “printer,” using the appropriate page size. And in the new PDF those crop marks are gone. So I was hoping that your first and simpler method would do that also. But it didn’t. The crops are still there. But my method still works. Yours was just easier.
Funny – I try that and the cropped parts are still there!
One last step would then be to adjust the page size, which can be done in the Crop dialog as well.
Great hint! This was something I spent a lot of time on…
For my application, it would be perfect if interactivity, eg buttons and links, would still work after flattening transparency in InDesign. But of course with the PDF/X-1a preset this is not possible.
Does anyone have a hint how I could permanently crop hidden data when the final pdf is intended for interactive use?
Neat trick, but there are problems. This method results in a pdf that is un-editable in Illustrator. As a package designer, I often receive art that needs to be edited in Illustrator. If this method is used to crop the art, I’m stuck. My vote would be to use this for client proofing only. The resultant image is an rgb “bitmap” and is unusable if vector is required. Also, there is no guarantee of color if the image needs to be reverted to cmyk.
Pearls Mom: I’m not sure what you’re doing wrong, but this technique works just fine and can be opened in Illustrator as well as any other PDF. Text remains editable text, vectors remain vectors.
Would love to know how, David! I am using Acrobat 10.1.10, Mac OS X 10.9.5. Still using Illustrator CS 5.5 (hard to justify the subscription with a limited amount of freelance at this point).
I have gone through your directions:
• Use the “crop” tool.
• Double click the cropped area and confirm in the “Set Page Boxes” screen.
• Use “Remove Hidden Information” under “Protection”.
• Select “Remove” in the “Remove Hidden” panel and wait for the removal process …”Done”.
• Save as ” ……”
Result is a pdf with the image of the crop ….not the vectors.
So ….what am I doing wrong? Would screen shots of my actions help?
Thank you for your time!!
Ah – tried this and it worked for sure – but all my type got rasterised. Will keep trying to narrow down what I did wrong!
I’m having a similar experience as Pearls Mom, trying the first technique.
Hi David,
I had a similar result as Pearls Mom. Would love to know how to get this to work properly. Thanks!
Nicole
I get an error message when I try to export or save as a PNG file…or any picture type file for that matter. This has been an extremely frustrating and time consuming problem for me. I work as a contract employee and one of the people I work for ONLY sends me files that are way too big and need to be cropped and reduced. NONE of the options I have found online have worked for me.
I am using Acrobat 9.5.5, Mac OS X 10.11.3
Using Adobe Acrobat 9, 1. Create a temporary folder, place the pdf to be cropped there 2. Crop the file using Adobe Acrobat 3. Open the Adobe cropped pdf file 4. Select File -> Export -> Image -> PNG 5. Click “Save” 6. Go into the temporary folder, select all the PNG files, right click select “Combine supported files in Acrobat” 7. Click “Combine files” 8. Save the newly combined file. This file has is permanently cropped and is of the same quality as the original
Colin3444: Ummm…. what?! A PNG image export is definitely not the same quality as the original. I assume you were just joking.
I just print the pdf to another pdf using “Adobe PDF” virtual printer. Make sure you don’t downsample any image or anything else in the process…
I realize this is now many years later, but I want to add myself to the list of “this trick worked in theory, but rasterized my data and is thus not a viable solution.” I’m using Adobe Acrobat Pro DC, and with the 732-page document I’m working with, the InDesign version of the trick isn’t an efficient option.