3D Printing With Photoshop CC
Adobe has been building increasingly sophisticated 3D modeling tools into Photoshop, and this month’s release of Photoshop CC (14.2) offers the most powerful techniques yet. Now the program has been updated with the ability to generate reliable models suitable for 3D printing. And if you have a 3D printer connected to your computer, you can print those models directly from the application.
Building 3D Models
While building 3D models directly in Photoshop requires a certain degree of skill, it’s easy to source models from a wide range of online sources. The trouble is that these models are often designed for viewing rather than printing, and will most likely fail when you try to print them. Photoshop’s major strength lies in its ability to make the models ‘watertight,’ the 3D printing term for patching holes and repairing errors in order to make a model printable.
Almost all home or small office 3D printers use the filament deposition method (FDM), which involves printing layer by layer from the bottom up. This means that objects with large overhangs need to be supported during printing, and here again Photoshop scores highly with its ability to generate the scaffolding needed to provide a base on which the models are built. There is no user control over the placement or style of this support structure, but it’s intelligently designed and works well in practice.
There’s also a lot of innovation in Photoshop’s 3D printing process. Photoshop can open a variety of 3D model formats directly (including OBJ, the most common format) and, when doing so, asks at what size you want to import it, in either inches or millimeters:

3D Print Settings
The new 3D Print Settings dialog box, found under the 3D menu, offers a range of options. You can choose to print directly to a connected printer, and several popular models are included, with more being added on an ongoing basis. Alternatively, you can export a printable model as an STL file, the standard interchange format for 3D printing; or if you don’t own a printer you can print directly using Shapeways, an online international 3D print service with whom Adobe has partnered. The advantage of the latter approach is that Shapeways can produce full color prints, unlike home FDM machines.
A new pane in the Properties panel displays the 3D print settings, where you can choose the print volume, the level of detail, and whether to include support structures:

Creating the Finished Model
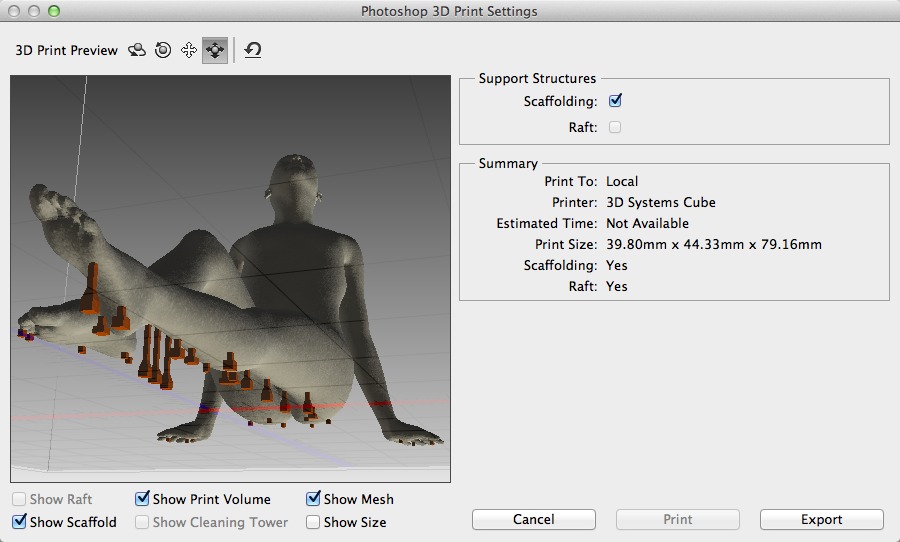
The next stage is to choose 3D Print from the 3D menu. This is where the heavy lifting gets done: Photoshop analyzes the model, repairs meshes and patches holes to make everything watertight, and adds the scaffolding support.
When the repair process is complete, you’re presented with a new dialog box that shows the finished, printable model. In this example, the original model (built in Daz Studio) wasn’t sitting flat on the ground, so it would be unprintable without support. The scaffolding supports needed to print this model are shown in red.

This scaffolding performs an essential job, although in practice it can often be too flimsy to support even itself, let alone the model above. The current support for scaffolding in Photoshop is limited; there’s no way to modify or remove scaffolding elements after they have been defined.
Photoshop’s 3D Printing Limitations
Adobe is marketing Photoshop’s 3D printing functionality as a finishing tool, rather than for 3D object creation. After all, the modeling tools in Photoshop are still very limited in their scope. And as far as it goes, things work very well: finished models are watertight and you can add color and texture to them.
But there’s very little scope for user control in the actual print process. You can’t determine the print speed or temperature, both of which must be customized to suit the type of filament you’re printing with. You also can’t set the layer height precisely, the retraction rate, or any of the parameters other 3D print preparation programs enable. And while you can export a model in STL format, 3D printers read GCode format, which means you’ll need to take the model into another application to slice it into this format after it has been exported.
Here’s the finished printed model:

You can still see some of the support holding up the lower part of the bent leg.
Conclusion
Photoshop’s 3D printing capabilities are very welcome news, as much for a statement of confidence in the future of 3D printing as for what you can actually accomplish with them today. There’s no doubt Adobe will bring the creative possibilities of 3D printing to many new users. And with strong features for repairing models and applying color and texture, they’re off to a good start. But until the user control and GCode export issues are addressed, there’s still a long way to go for Photoshop’s 3D printing features to be as robust as they could be.
In the meantime, if you want to get excited about the creative possibilities of 3D printing, check out this video from Shapeways:

